Battery switch on travel trailer function is crucial for managing your RV’s power. Understanding how to use your battery switch correctly is key to preventing electrical problems and ensuring a smooth camping experience. This guide will walk you through the different types of switches, how to connect and disconnect your batteries safely, troubleshoot common issues, and perform essential maintenance.
We’ll cover everything from basic operation to advanced troubleshooting, making sure you’re confident in handling your trailer’s electrical system.
We’ll explore the various types of battery switches (single, dual, rotary), their wiring configurations, and best practices for connecting to shore power. Learn how to safely disconnect batteries, prevent corrosion, and address common problems like blown fuses or low voltage. We’ll also delve into the interaction between your battery switch and other electrical components, such as inverters and converters, and provide a maintenance schedule to keep your system running smoothly for years to come.
Understanding Battery Switch Functionality in Travel Trailers
A battery switch is a crucial component in a travel trailer’s electrical system, allowing you to control the flow of power from your trailer batteries to various appliances and systems. Understanding its function and operation is essential for safe and efficient use of your RV. This section will break down the purpose, types, wiring, and operation of these important switches.
Battery Switch Purposes
The primary purpose of a battery switch is to isolate your trailer’s house batteries from the rest of the electrical system. This prevents unwanted battery drain when the trailer is not in use and protects your batteries from damage. It also allows you to select which battery bank (if you have more than one) powers your systems, allowing for charging one bank while using the other, or isolating a faulty battery for testing and repair.
This isolation is especially important for extended periods of storage to prevent a completely drained battery.
Types of Battery Switches
Several types of battery switches are used in travel trailers, each with its own advantages and disadvantages.
- Single Battery Switch: This is the simplest type, controlling only one battery bank. It’s suitable for trailers with a single battery system. It usually has only two positions: “On” and “Off”.
- Dual Battery Switch: This switch controls two separate battery banks, often used in trailers with a house battery and a starting battery. These usually have three positions: “Both,” “Battery 1,” and “Battery 2,” allowing you to select which battery or both to use.
- Rotary Battery Switch: These switches offer more control and often include additional positions such as “Off,” “Battery 1,” “Battery 2,” “Both,” and sometimes a “Start” position dedicated to the engine battery. They provide more granular control over battery power distribution. They are typically more robust than simpler switches.
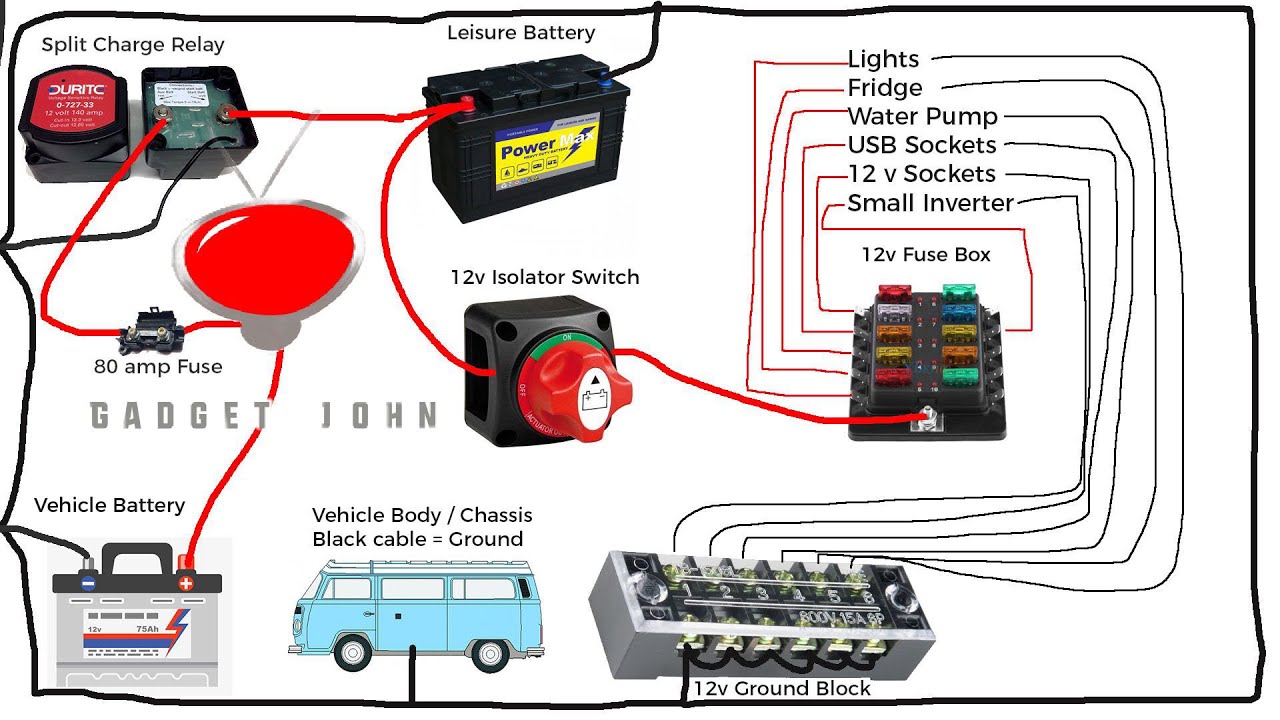
Typical Wiring Configuration
The wiring configuration varies depending on the type of switch and the trailer’s electrical system. However, a common setup involves the positive (+) cables from each battery connecting to the switch, and the output of the switch connecting to the trailer’s main power distribution panel. The negative (-) cables are usually connected directly to the chassis, creating a ground. Always consult your trailer’s wiring diagram for the specific configuration.
Improper wiring can lead to electrical problems or even fire hazards.
Operating a Battery Switch, Battery switch on travel trailer function
Operating a battery switch is generally straightforward, but proper procedure is crucial.
So, you’re an audiophile who loves to travel? Awesome! Check out this guide on building the perfect audiophile travel setup for your next adventure. It’s all about finding that sweet spot between portability and sound quality. Then, for some extra inspiration and setup ideas, head over to this blog post: audiophile travel aetup.
It’s got some killer tips on packing and protecting your precious gear. Remember, good sound doesn’t have to stay at home!
- Identify the Switch Positions: Familiarize yourself with the markings on your switch (e.g., “On,” “Off,” “Battery 1,” “Battery 2,” “Both”).
- Turn the Switch Off: Before performing any maintenance or disconnection, always turn the switch to the “Off” position to completely disconnect the batteries from the system.
- Select the Desired Position: Once you’ve completed any maintenance or troubleshooting, select the appropriate position to power your systems from the desired battery bank(s).
- Check Your Systems: After changing the switch position, verify that the intended systems are working correctly. If not, double-check your connections and switch position.
Connecting and Disconnecting Batteries
Connecting and disconnecting your travel trailer’s batteries involves a few key steps to ensure safety and prevent damage to your electrical system. Understanding these procedures is crucial for both the safe operation and longevity of your trailer’s battery system. Always prioritize safety when working with electricity and batteries.
Connecting to Shore Power
Before connecting to shore power, ensure your battery switch is in the correct position. The position will vary depending on your specific switch; consult your owner’s manual if you are unsure. Typically, you’ll want the switch set to “Both” or “On” to allow power from both the batteries and shore power to feed the trailer’s systems. This position allows for charging of the batteries while also powering your appliances.
After confirming the switch position, securely connect your shore power cable to the trailer’s inlet and then to the power source. Monitor the charging process, especially if the batteries have been significantly discharged.
Disconnecting Batteries from the Trailer’s Electrical System
Safely disconnecting your batteries is essential to prevent accidental shorts or draining of your batteries. First, turn off all appliances and systems running on the trailer’s 12V system. Then, locate your battery switch. Move the switch to the “Off” position to completely disconnect the batteries from the trailer’s electrical system. This isolates the batteries, preventing any potential power drain or accidental shorts.
For added safety, especially if you’ll be storing the trailer for an extended period, consider disconnecting the negative (-) terminal cable from each battery using a wrench. This is a more complete isolation than just using the battery switch alone.
Safety Precautions When Working with Batteries and Electrical Systems
Working with batteries and electrical systems demands caution. Always wear safety glasses to protect your eyes from potential splashes of battery acid or sparks. Never work on the electrical system in wet conditions or while standing in water. Use insulated tools to avoid electrical shock. Ensure good ventilation when working with batteries, as they release hydrogen gas, which is flammable and explosive.
If you’re unsure about any step, consult a qualified electrician or RV technician. Remember, safety is paramount.
Maintaining Battery Connections and Preventing Corrosion
Proper battery maintenance is key to extending their lifespan and preventing costly repairs. Regularly inspect battery terminals for corrosion. Corrosion can hinder electrical conductivity and lead to poor performance. Clean terminals with a wire brush and baking soda solution to remove any buildup. Apply a battery terminal protector, such as dielectric grease, to prevent future corrosion and improve conductivity.
Tighten the terminal connections to ensure a secure fit. Properly storing your batteries when not in use (fully charged and in a cool, dry place) also helps extend their lifespan and reduces corrosion.
Troubleshooting Common Battery Switch Issues
Dealing with a malfunctioning battery switch in your travel trailer can be frustrating, but systematic troubleshooting can often pinpoint the problem quickly. Understanding the typical issues and how to address them will save you time and potential headaches on the road. This section will guide you through identifying and resolving common battery switch problems.
Battery switch problems often manifest as a complete lack of power, intermittent power failures, or low voltage. These issues can stem from several sources, including the switch itself, wiring problems, blown fuses, or even issues with the batteries themselves. Before diving into complex repairs, always start with the simplest checks.
Identifying Common Problems
Common problems associated with travel trailer battery switches range from simple to complex. A completely dead system, for example, might indicate a blown fuse, a faulty switch, or a problem with the battery connections. Intermittent power suggests a loose connection somewhere in the system – perhaps a corroded wire or a poorly seated terminal. Low voltage, even with seemingly good connections, might point to a weak or failing battery.
Troubleshooting a Non-functioning Battery Switch
The first step in troubleshooting a non-functioning battery switch is a visual inspection. Check for obvious signs of damage, such as burnt wires, melted plastic, or loose connections. Carefully examine the switch itself for any signs of wear or damage. Pay close attention to the terminals – corrosion can significantly impede electrical flow. Next, check the fuses both in the switch and in the main electrical panel of your travel trailer.
A blown fuse will be visually apparent; it will appear broken or have a burnt appearance. Replacing a blown fuse is usually a simple fix. If replacing the fuse doesn’t solve the problem, move on to checking the wiring for breaks, corrosion, or loose connections. Use a multimeter to test the continuity of the wiring to ensure a complete circuit.
If all the fuses are intact and the wiring is sound, the problem likely lies within the battery switch itself.
Diagnosing and Repairing a Faulty Battery Switch
If your visual inspection and fuse checks don’t reveal the problem, you’ll need a multimeter to test the switch’s functionality. With the switch in the “off” position, check for continuity between the input and output terminals. There should be no continuity. Then, switch to the “on” position and retest; you should now have continuity. Lack of continuity in either position points to a faulty switch.
Repairing a faulty switch usually means replacing it entirely. This involves disconnecting the wiring from the old switch, carefully noting the connections, and then connecting the new switch according to the wiring diagram. Always disconnect the negative battery terminal before working on any electrical components.
Causes for Low Battery Voltage or Power Loss
Low battery voltage or power loss can have several causes related to the battery switch. A poorly connected or corroded terminal on the battery or switch can significantly increase resistance and reduce voltage. Similarly, a loose or damaged wire in the circuit can cause a voltage drop. A faulty switch itself may not completely connect the circuit, leading to reduced power.
Additionally, a weak or failing battery, even if the switch is working correctly, will result in low voltage. Regular battery maintenance, including cleaning terminals and testing battery voltage, is crucial for preventing these problems. A multimeter can be used to test voltage at various points in the circuit to pinpoint the location of the voltage drop.
So, you’re an audiophile who loves to travel? Awesome! Check out this guide on creating the perfect audiophile travel setup for your next adventure. It covers everything from portable DACs to noise-canceling headphones. Then, for some extra inspiration and tips, browse this other great resource on audiophile travel setups – it’s got some killer recommendations for lightweight and high-quality gear that won’t weigh down your backpack.
Happy listening on the go!
Battery Switch and Electrical System Integration
Your battery switch isn’t just a simple on/off switch; it’s a crucial component that manages the flow of power throughout your travel trailer’s electrical system. Understanding its interaction with other systems is key to preventing electrical issues and maximizing your RV’s power efficiency. This section will explain how your battery switch works in conjunction with other electrical components, the importance of proper usage, and the consequences of mistakes.The battery switch acts as the central control point for your trailer’s house batteries.
It determines whether power flows directly from the batteries to the trailer’s 12-volt systems (lights, water pump, etc.), or if it’s isolated. This isolation is vital when disconnecting from shore power or your tow vehicle to prevent battery drain. It also often plays a role in determining whether power from shore power or a generator charges the batteries.
The switch’s position directly influences the operation of other electrical components, like the inverter and converter.
Inverter and Converter Interaction
The inverter converts 12-volt DC power from your batteries into 120-volt AC power, supplying household appliances. The converter performs the opposite function, changing 120-volt AC power (from shore power or a generator) into 12-volt DC power to charge your batteries. The battery switch controls the DC power source for the inverter; if the switch is off, the inverter won’t have power, even if you’re plugged into shore power.
Similarly, the converter will charge the batteries only if the switch is in the correct position to allow the flow of power from the shore power or generator. Incorrect switch settings can lead to the inverter drawing power from the batteries even when they are low, causing a premature battery drain, or prevent the converter from charging the batteries effectively, resulting in insufficient power.
Power Distribution Management
The battery switch’s primary role is to manage the distribution of power from your house batteries. When the switch is “on,” the batteries supply power directly to the 12-volt systems in your trailer. When “off,” this direct power flow is interrupted, protecting your batteries from discharge. In some setups, an intermediate position might exist, allowing the batteries to charge from shore power or a generator while simultaneously preventing the batteries from powering the trailer’s 12-volt systems.
This allows for charging while preventing accidental drain.
Implications of Incorrect Switch Usage
Improper use of the battery switch can lead to several problems. For instance, leaving the switch on while the trailer is stored for extended periods without charging can completely drain the batteries. Conversely, leaving the switch off while connected to shore power prevents the batteries from charging. This can lead to a dead battery when you need it most.
Additionally, inadvertently switching the batteries to the “on” position while connected to shore power could overload the system if both the shore power and batteries are trying to supply power simultaneously.
Alternative Battery Power Management Approaches
While a simple battery switch is common, other approaches to managing battery power exist. Some RVs use more sophisticated systems, including automatic battery switches that sense the state of the batteries and switch accordingly. Others incorporate battery management systems (BMS) that monitor voltage, current, and temperature to optimize charging and discharging, preventing overcharging or deep discharge. These systems offer more precise control and protection for your batteries compared to a basic on/off switch.
Consider the complexity of your electrical system and your budget when selecting a battery management solution.
Battery Switch Maintenance and Replacement
Keeping your travel trailer’s battery switch in top condition is crucial for reliable power. Regular maintenance prevents costly repairs and ensures your electrical system functions flawlessly, providing peace of mind on the road. Neglecting maintenance can lead to corrosion, poor connections, and ultimately, battery switch failure.
Battery Switch Maintenance Schedule
A proactive maintenance schedule helps extend the life of your battery switch and related components. This schedule assumes average use and environmental conditions. Adjust the frequency based on your specific usage and climate.
- Monthly Inspection: Visually inspect the battery switch for any signs of corrosion, loose connections, or damage. Check the terminals for cleanliness and tightness.
- Semi-Annual Cleaning: Thoroughly clean the battery switch and terminals using a wire brush and baking soda solution. Apply a corrosion inhibitor to the terminals after cleaning.
- Annual Deep Inspection: Perform a more thorough inspection, including checking all wiring connections to the switch and ensuring proper grounding. Consider using a multimeter to test the voltage and current flow through the switch.
- Every Two Years or as Needed: Replace the battery switch if you notice significant corrosion, loose connections that can’t be repaired, or if the switch is malfunctioning despite cleaning and tightening.
Replacing a Faulty Battery Switch
Replacing a battery switch is a relatively straightforward process, but safety should always be the top priority. Disconnect the battery’s negative terminal before starting any work.
- Disconnect the Battery: Always disconnect the negative (-) battery terminal first to prevent accidental short circuits. This is a crucial safety step.
- Remove the Old Switch: Carefully disconnect all wires connected to the battery switch. Take photos or make notes to remember the wiring configuration before disconnecting anything. Unscrew the switch from its mounting location.
- Install the New Switch: Mount the new switch in the same location as the old one. Ensure it’s securely fastened. Reconnect the wires according to your notes or photos, paying close attention to the correct polarity.
- Reconnect the Battery: Reconnect the positive (+) terminal first, followed by the negative (-) terminal.
- Test the Switch: Turn the switch on and off to verify proper operation. Check your trailer’s electrical system to ensure everything is functioning correctly.
Tools and Materials for Battery Switch Maintenance and Replacement
Having the right tools and materials on hand makes the process smoother and safer.
- Wire brush
- Baking soda
- Water
- Corrosion inhibitor spray
- Screwdrivers (Phillips and flathead)
- Wrench (size appropriate for battery terminals)
- Multimeter (optional, for testing)
- Replacement battery switch (if needed)
- Protective gloves
- Safety glasses
Cleaning and Inspecting Battery Terminals and Connections
Clean battery terminals and connections regularly to prevent corrosion and ensure a good electrical connection. Corrosion can restrict current flow, leading to poor performance or even failure of the electrical system.
- Disconnect the Battery: Always disconnect the negative (-) terminal first.
- Clean the Terminals: Use a wire brush to remove corrosion from the battery terminals and the connections to the battery switch. A baking soda and water paste can help loosen stubborn corrosion.
- Inspect for Damage: Check for any signs of damage to the terminals or connections. Replace any damaged parts.
- Apply Corrosion Inhibitor: After cleaning, apply a corrosion inhibitor to the terminals to prevent future corrosion.
- Tighten Connections: Ensure all connections are tight and secure.
- Reconnect the Battery: Reconnect the positive (+) terminal first, then the negative (-) terminal.
Illustrative Examples of Battery Switch Configurations
Understanding different battery switch configurations is crucial for optimizing your travel trailer’s power system. The choice depends on your power needs, budget, and the complexity you’re comfortable managing. Let’s explore three common setups.
Single Battery Switch Configuration
This is the simplest setup, ideal for smaller trailers with a single battery.
| Component | Description |
|---|---|
| Battery | Single 12V deep-cycle battery. |
| Battery Switch | A simple on/off switch connecting the battery to the trailer’s electrical system. |
| Trailer Wiring | Standard 12V wiring connecting the battery to the trailer’s lights, appliances, and other components. |
Advantages: Simple, inexpensive, easy to install and understand. Disadvantages: Only allows for one battery; no ability to switch between batteries or charge one while using the other; limited power capacity.
Dual Battery Switch with Combined Output
This setup uses two batteries, often for increased capacity or to separate house and starting power.
| Component | Description |
|---|---|
| Battery 1 (House) | 12V deep-cycle battery powering house appliances. |
| Battery 2 (Starting) | 12V deep-cycle battery powering the trailer’s starting system (if applicable). |
| Battery Switch | A switch allowing selection of Battery 1, Battery 2, both combined, or off. |
| Trailer Wiring | Wiring connecting each battery to the switch and the switch to the trailer’s electrical system. |
Advantages: Increased power capacity; separate power sources for different systems; ability to charge one battery while using the other. Disadvantages: More complex than a single switch; requires careful wiring; potential for confusion if not properly labeled.
Dual Battery Switch with Separate Outputs
Similar to the previous setup, but with completely independent circuits for each battery.
| Component | Description |
|---|---|
| Battery 1 (House) | 12V deep-cycle battery powering house appliances. |
| Battery 2 (Starting) | 12V deep-cycle battery powering the trailer’s starting system (if applicable). |
| Battery Switch 1 | Controls power from Battery 1 to the house system. |
| Battery Switch 2 | Controls power from Battery 2 to the starting system. |
| Trailer Wiring | Separate wiring circuits for each battery and its respective switch. |
Advantages: Complete isolation of circuits; prevents draining of one battery by the other; increased safety and reliability. Disadvantages: Most complex setup; requires more wiring and switches; potentially higher cost.
Safety Procedures and Best Practices: Battery Switch On Travel Trailer Function

Working with your travel trailer’s battery system requires careful attention to safety. Improper handling can lead to serious injury from electrical shock, burns, or explosions from escaping battery gases. Always prioritize safety when dealing with batteries and electrical components.
Regular inspection and maintenance are crucial for ensuring the longevity and safe operation of your battery switch and the entire electrical system. Neglecting this can lead to premature failure, potentially resulting in inconvenient breakdowns or even dangerous situations while traveling. A properly functioning battery switch is key to safe and reliable power management in your RV.
Battery Switch Safety Precautions
Before you begin any work on your battery switch, it’s vital to understand and follow these safety precautions. These steps will minimize the risk of accidents and ensure your safety.
- Always disconnect the negative (-) battery terminal first before working on any part of the electrical system. This prevents accidental shorts and electrical shocks.
- Wear safety glasses to protect your eyes from potential sparks or acid splashes.
- Wear gloves to protect your hands from acid and corrosion.
- Work in a well-ventilated area. Battery gases are flammable and potentially harmful to your health.
- Have a fire extinguisher readily available. Battery acid can ignite flammable materials.
- Never work on the battery system if it’s raining or the area is wet. Water conducts electricity and increases the risk of shock.
- Use insulated tools to avoid accidental shorts and shocks.
- If you’re unsure about any aspect of the process, consult a qualified RV technician.
Battery Switch Inspection and Maintenance
Regular inspection and maintenance of your battery switch will extend its lifespan and ensure safe operation. A simple routine check can prevent costly repairs or dangerous situations down the road.
Inspect the switch regularly for corrosion, loose connections, and signs of damage. Tighten any loose connections and clean any corrosion with a wire brush and baking soda solution. Check the switch’s operation by turning it to different positions and verifying that the correct circuits are activated. If you notice any problems, address them immediately.
Selecting a Suitable Battery Switch
Choosing the right battery switch for your travel trailer is essential for safe and reliable power management. The switch’s amperage rating must match or exceed the total amperage draw of your trailer’s electrical system. Consider the number of batteries you have and whether you need a switch that allows for separate control of each battery bank (like a dual battery switch) or a simpler single-bank switch.
For example, if your trailer has two 12-volt batteries and a total amperage draw of 100 amps, you’ll need a battery switch with a minimum 100-amp rating, preferably higher for safety margins. A higher-rated switch provides additional capacity for future upgrades or increased power demands.
Mastering your travel trailer’s battery switch is essential for safe and reliable power management. By understanding its function, performing regular maintenance, and knowing how to troubleshoot common problems, you can prevent costly repairs and enjoy worry-free adventures. Remember to always prioritize safety when working with electrical systems and consult a professional if you’re unsure about any aspect of your setup.
Happy travels!
Expert Answers
What happens if I leave my battery switch on all the time?
Leaving your battery switch on constantly can drain your batteries, especially if you’re not connected to shore power. It’s best to turn it off when not using the trailer to conserve battery life.
How often should I check my battery terminals?
Inspect your battery terminals at least every three months, or more frequently if you notice corrosion or unusual behavior. Clean them with a wire brush and baking soda solution if necessary.
Can I use a different type of battery switch than what came with my trailer?
While you can replace your battery switch, it’s crucial to choose a switch with the correct amperage rating for your system. Consult a qualified electrician or RV technician to ensure compatibility.
My battery switch is making a clicking noise. What does that mean?
A clicking noise from your battery switch often indicates a faulty switch or a problem with the wiring. This needs professional attention; don’t attempt repairs yourself.
